Grab a tennis ball and release painful muscles knots with these simple techniques! If you’re affected by chronic muscle pain, you may be dealing with Myofascial Pain Syndrome.
Myofascial pain syndrome is a chronic condition. In this condition, pressure on sensitive points in your muscles (also known as trigger points or knots) causes pain in the muscle (known as an active trigger point) and sometimes in seemingly unrelated parts of your body (known as referred pain).
Myofascial Pain Syndrome is typically caused from repetitive motions used in jobs, exercise, or other stress-related muscle tension. The overuse of muscles during these repetitive motions causes sensitive areas of tight muscle fibers to form in the muscle, creating a trigger point. The difference between this and typical muscle tension is that the pain persists or worsens over time.
Self-myofascial release (SMR) treats myofascial pain syndrome by relaxing contracted muscles, improving blood and lymphatic circulation, and stimulating the stretch reflex in muscles. A tennis ball is a small, lightweight, effective tool for SMR that makes it easy to work into trigger points.
Rules For Tennis Ball SMR
Releasing fascia and trigger points can be painful and cause soreness afterward. When releasing a trigger point, the pain should be a satisfying type of pain, like when you get a deep tissue massage. Here are some rules to remember:
- Warm-up the area beforehand. Go for a quick walk, practice some dynamic stretches, or place a heat pad over the area.
- When you find a point of tension, hold the ball in place and keep the pressure sustained. Listen to your body. Again, the sensation should be satisfying, not painful.
- Hold for 20-30 seconds and breathe deeply. Hold the spot until you feel the pain release.
- Stop if it doesn’t feel right and listen to your body. This is a good rule of thumb with any type of exercise and/or pose.
- Static stretch the muscle afterward.
These exercises can be done daily. You’ll need an exercise mat and two tennis balls.
Full Calf Rollout

Your calves are made up of two muscles: the gastrocnemius and the soleus. The gastrocnemius has four trigger points below the knee joint. These trigger points refer pain to the calf, back of the knee and thigh, and the arch of the foot. The soleus has two trigger points that cause pain in the achilles, heel, and upper calf.
- Start by placing your ball on the floor.
- Position your lower leg so that the ball is placed directly above your Achilles tendon. Place your left foot on the floor to help you roll forward and back on the ball. Roll slowly around this area to look for a trigger point. If you find one, stop and hold for 20-30 seconds.
- Slide your body forward to roll the ball towards your knee. Roll it towards the outer edge of your calf, looking for trigger points, then roll to the inside of the calf. Stop whenever you feel pain and tension, holding for 20-30 seconds. Switch legs.
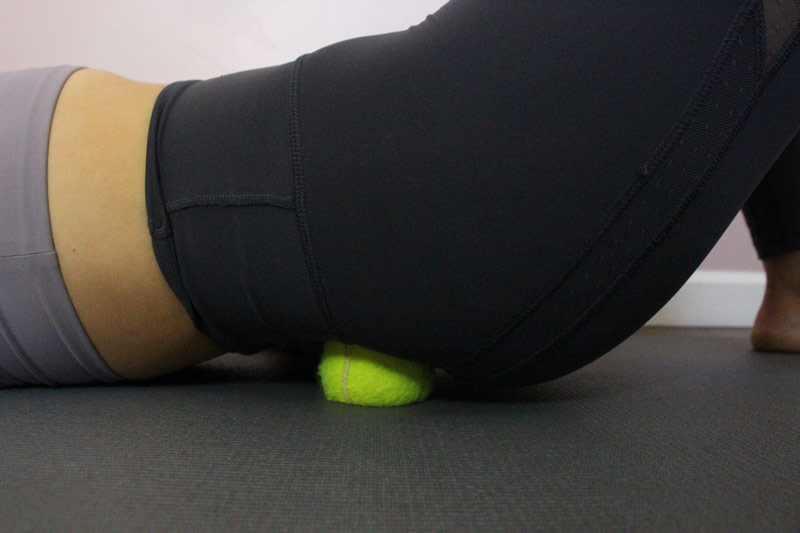
Outer Hip Release

The gluteus medius, gluteus minimus, and piriformis are all muscles on the outer glute and hip area. Trigger points in these muscles can lead to low back pain, hip pain, and leg pain.
- Start by placing the ball underneath the outside of your right hip.
- Slowly explore the outer glute and hip area, rolling towards the top of the hip and then going side-to-side.
- When you find a trigger point, stop and hold for 20-30 seconds. After you’ve completed your right side, switch to the left.
Gluteus Maximus Release

A common trigger point in the gluteus maximus often tricks people into thinking that they have low back pain.
- Sit on the ball so that it rests underneath the top part of the gluteus maximus, right below your lower back.
- Take small movements rolling down the glute, back up, and then side-to-side.
- Hold for 20-30 seconds whenever you find a trigger point. Once you’ve completed one side, switch to the other.
Hamstrings Rollout

The hamstrings are a group of three muscles that host up to nine trigger points. These trigger points can refer pain to the glute, calf, back of the knee, and the back of the thigh.
- Sit and straighten your legs down the mat. Slide the ball underneath your right thigh so that it rests under the muscle right above your knee joint.
- Roll the ball slowly up the inner part of the hamstrings, stopping to hold for 20-30 seconds when you find a trigger point.
- Once you get to the top of the thigh, roll the ball towards the outer part of the hamstrings. Roll back down towards the knee, stopping to hold when you feel a knot. Switch sides.
Double SI Joint Release
This movable joint, which is part of the pelvis, connects the sacrum to the iliac. This joint tends to become tight in women due to hormones, pregnancy, and labor. Dysfunction in the SI joint causes lower back and leg pain and using tennis balls can be an effective way to loosen it up.
- Lie on your back with your knees bent and feet on the ground.
- Lift your hips and place 2 tennis balls under your pelvis, about 2-4 inches apart.
- Rest for 60 seconds. Keep your knees bent, or to increase the intensity, straighten your legs.
- Try moving the balls around to find different points of tension.
Wall Lat Release

Trigger points in the lats can refer pain along the lower shoulder blade, mid back, and all the way down the inner arm to your fingers.
- Begin standing next to a wall and reach your arm above your head. Place the ball on your back right next to you armpit. Lean against the wall to hold it in place.
- Slowly roll around the area and search for a tender spot. Try lowering your arm and slightly rolling towards the spine. (Note: Never roll the ball on your spine.) When you find a spot, stop and hold for 20-30 seconds and then continue on.
- Roll the ball down your back about halfway, continuing to look for tender spots. Once you’ve completed this side, switch sides.
Wall Rhomboid Rollout

A feeling of pain coming from your inner shoulder blades could indicate that you have trigger points found in the rhomboids.
- Begin standing next to a wall. Place the ball between the bottom of your shoulder blade and your spine. Lean against a wall to hold it in place and cross your arms in front of your chest.
- Slowly roll the ball up between your shoulder blade and the wall.
- When you feel a tight spot, hold for 20-30 seconds. You can also make small up-and-down and side-to-side movements on the spot. Once you feel it release, continue on. After you’ve completed one side, switch to the other.
Medial and Rear Deltoid Release

Trigger points in the deltoid muscle cause pain in the upper arm, shoulder blade area, and in the front of the shoulder.
- Start by placing a ball on the outside of your shoulder and lean against a wall.
- Roll slowly over the upper half of your arm searching for tender spots. When you find one, hold for 20-30 seconds and then move on.
- Place the ball on the meaty part of the back of your shoulder right above the armpit and lean against a wall. Cross your arms in front of your chest.
- Take small movements around this area, stopping to hold whenever you find a trigger point. Then, switch sides.
Chest Release

Trigger points in the pecs (chest muscles) cause pain in the chest and shoulders, and can foster a rounded shoulder posture.
- Begin by placing the ball on your upper chest. Lean against a wall with your palms facing away from you.
- Slowly roll outward towards the armpit. Lift your arm straight out to the side to get a little deeper, then lower it back down.
- Then, roll up the chest until you are below the collarbone and then slowly circle all the way back around to your starting point. Stop whenever you feel a trigger point, holding for 20-30 seconds. Once you’ve completed one side, switch to the other.

(Your Next Workout: 11 Easy Bodyweight Exercises for Lower Back Pain)