If you’re achy from back pain, use these soothing foam roller stretches to release stiffness.
While stretching your muscles is essential for combatting pain and stiffness, releasing the fascia that encases the muscles is just as important. The fascia that surrounds each individual muscle is all one big interwebbing, meaning it connects each muscle to every other muscle in the body. This is part of the reason why a trigger point – also known as a “knot” – in one muscle can cause pain in a completely different part of the body. This is known as referred pain. So, tightness in your back could be causing pain somewhere seemingly unrelated and vice versa. (1)
Foam rolling is a form of self-myofascial release (SMR) that can be used to massage out trigger points in the muscles and improve overall circulation. You can also use a foam roller to create a larger range of motion while static stretching a muscle. (2)
Studies show that foam rolling increases range of motion and mobility, which lead to better posture, faster recovery from daily activities and exercise, and overall higher physical performance. (3, 4)
Rules for foam rolling:
- Apply moderate pressure to the muscle that you are foam rolling and stop immediately if something doesn’t feel right or the pain feels like too much. Always listen to your body.
- Roll slowly around the areas of direct pain to help you to find trigger points.
- Once you find a knot, hold for a minimum of 20 seconds or until you feel a release of the pain, and then continue on until you find the next one. You may experience intensity of pain before the release.
- Never foam roll over your joints.
- Expect soreness the next day, just as if you had a deep tissue massage. Also, make sure to drink plenty of water after foam rolling.
- Keep a consistent foam rolling schedule to see improvement.
Use these 9 foam rolling exercises to relieve back pain and achieve overall balance in your body. Start with a medium thickness foam roller. Note where your trigger points and tightness are and make sure to do the exercises that assist those areas daily.
9 Foam Roller Stretches to Erase Back Pain
Mid-Upper Back Roll | 20 sec per trigger point

This foam rolling technique uses SMR to release trigger points and tightness in the muscles of the mid- and upper back.
- Start by sitting down on the floor with your back against the foam roller. Bend your knees and place your feet hip-width distance apart on the ground. Bend your elbows and place your hands behind your head.
- Lean back so that your mid-back is supported by the foam roller, then press into your feet and lift your hips slightly. Support your head with your palms and feel a small stretch through your chest and shoulders.
- Walk your feet away from your body, an inch at a time, to roll slowly up your back, towards your head. When you find a tight and painful spot, stop and hold for 20 seconds and then continue on. Stop once you get right below the shoulders, roll back down to the starting position.
Lat Rollout | 20 sec per trigger point

Tight lats are a common problem these days, since they get tight from sitting for prolonged periods of time. This foam rolling exercise helps to open them back up and release hidden trigger points.
- Start sitting next to your foam roller. Lie down on it so that you are lying on your right side with it resting horizontally underneath your right armpit.
- Lean back slightly, then slowly roll the foam roller down your body an inch or two.
- When you find a trigger point, stop and hold for 20-30 seconds. You can take small movements, going up and down and rocking forward and back on the area.
Cactus Arms | 10 reps

This exercise increases flexibility and mobility in the chest and shoulders, reducing knots and tension in the upper back and neck.
- Start by lying on the foam roller so that runs vertically up and down your spine. It should support your head and your hips. Engage your lower belly and press your lower back into the foam roller. Keep your chin slightly tilted down so that the back of your neck is long.
- Take your arms out to the sides and bend your elbows to 90-degree angles so that your elbows are on the floor and your fingertips are pointing up towards the ceiling.
*Note: If you have tight chest muscles, it may be challenging to keep your elbows on the ground. So instead, you could do this flat on the floor. - Take a deep breath in, then exhale as you allow your forearms to fall back so that the top of your forearms and hands come to the ground. Pause for a moment to feel the stretch through your chest. Inhale to bring your arms back to the starting position.
Snow Angels | 10 reps

This exercise helps to increase mobility in the chest and shoulders. It also helps to massage out knots in the rhomboids and trapezius muscles.
- Lie down on the foam roller so that runs vertically up and down your spine, supporting both your hips and your head.
- Bring your arms down alongside your body with your palms facing up. Draw your navel in towards your spine so that your lower back is pressing into the foam roller.
- Inhale to slowly sweep your arms out and up like a snow angel, keeping your fingertips brushing the ground the entire time. Pause at the top to feel the stretch through your chest and shoulders. Then, exhale to slowly sweep your arms back down by your sides.
Reach to the Sky | 10 reps per side
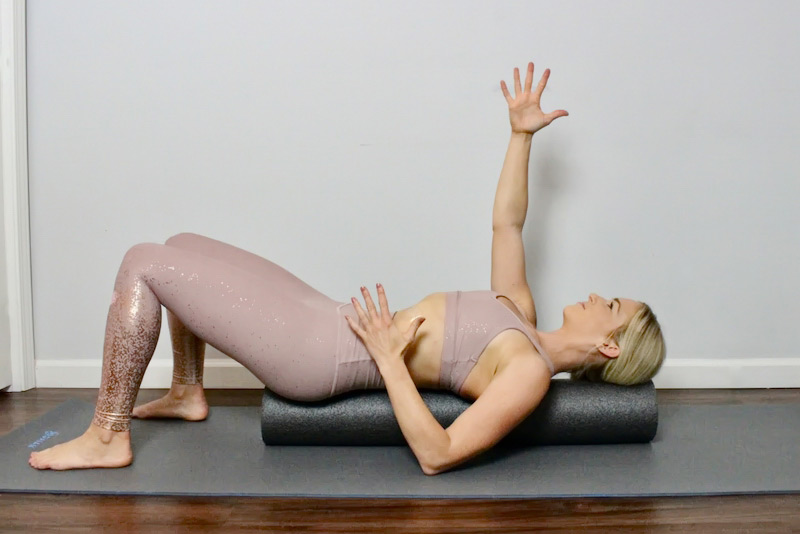
This exercise stretches the lats and loosens knots between the shoulder blades.
- Start by bending your elbows to 45-degree angles and placing them on the floor. Spread your fingers wide so that they are extended towards the ceiling. Squeeze your shoulder blades into the foam roller.
- Firmly press your left elbow into the floor as your reach your right arm straight up towards the ceiling. Squeeze your left shoulder blade down as your feel your right shoulder blade stretch.
- Hold for a moment and then switch sides by pressing the right elbow into the ground and reaching up through the left arm.
Overhead Reach | 10 reps

This exercise increases mobility in the lats and shoulders.
- Begin with your arms down alongside your body with your palms facing in.
- Extend your right arm over your head, keep the palm turned inward, and reach through your fingertips. At the same time, keep your left hand down by your side, keep the palm turned inward, and reach your left fingertips towards your feet.
- Hold for a moment to feel the stretch through your shoulders and lats, then switch sides.
Psoas Release | 20 sec per trigger point

The psoas major is the largest hip flexor muscle and attaches directly to your lumbar spine. When this muscle gets tight, it pulls on your lower back, tilting your pelvis forward and causing pain.
- Start by lying face down on your foam roller so that it rests underneath the bony point of your right hip. Bring your left leg out to the side at a 90-degree angle and place your forearms on the ground in front of you to support some of your weight.
- Keep your right leg straight back behind you and begin to roll in small movements up-and-down.
- When you find a trigger point, stop and hold it on the spot for 20 seconds or until you feel a release. You can play with rocking side-to-side on the trigger point. Repeat on the left leg.
Figure 4 | 20 sec per trigger point

This exercise releases trigger points and tightness in the piriformis and gluteus medius. When tight, both of these muscles can lead to painful sciatica.
- Sit on the foam roller with your knees bent and your feet on the floor. Place your hands on the ground behind you to support yourself.
- Cross your right ankle on your left thigh right above your knee. Then, turn your body to the right so that you are applying pressure to the outer right glute.
- Take small up-and-down and back-and-forth movements to look for trigger points. When you find one, stop and hold for 20 seconds, then continue on. Repeat on the other side.
Gluteus Maximus Release | 20 sec per trigger point

The top of the gluteus maximus contains a painful trigger point that can lead to low back pain.
- Start by sitting up on your foam roller with your knees bent and your feet on the floor.
- Place your hands on the ground behind you to support yourself. Roll forward an inch and rotate your knees and hips a little bit to the right to move pressure onto the top part of your right glute.
- Slowly roll around the area, taking small up-and-down and back-and-forth movements to look for trigger points. When you find one, stop and hold for 20 seconds before moving on. Once you’ve completed the right side, switch to the left.

(Your Next Workout: 9 Amazing Stretches to Release Shoulder Pain)